Biscoff cookie crust cheesecake has a way of bringing pure joy to any gathering, and I’ve found it’s my go-to for impressing friends without breaking a sweat. I still remember the first time I tasted it – the rich, creamy filling melded perfectly with that spiced, buttery cookie base. It was unlike any cheesecake I’d had before! The aroma alone, a mix of warm spices and sweet cream cheese, is enough to make your mouth water. This easy no-bake wonder is a true showstopper, and I’m so excited to share this simple yet decadent Biscoff cheesecake recipe with you. Let’s get baking (or rather, no-baking)!
Why You’ll Love This Biscoff Cookie Crust Cheesecake
Get ready to fall in love with this incredible dessert. It’s more than just a cheesecake; it’s an experience! Here’s why this recipe is a winner:
- Effortless preparation: It’s a no-bake wonder, meaning less time in the kitchen and more time enjoying.
- Unbeatable flavor: The unique spiced cookie notes of Biscoff are simply divine.
- Incredibly smooth texture: You’ll adore this creamy biscoff cheesecake dessert; it melts in your mouth.
- Visually stunning: The golden crust and decadent topping make it a showstopper.
- Perfect for any occasion: This easy biscoff cheesecake dessert is ideal for parties, holidays, or just a Tuesday treat.
- No oven required: Perfect for warmer months or when your oven is already in use.
- Versatile topping: Easily customizable to suit your taste.
- Crowd-pleasing: Everyone raves about it, making it a guaranteed hit.
Ingredients for Biscoff Cookie Crust Cheesecake
Gathering your ingredients is the first step to creating this amazing Biscoff cookie base cheesecake. You’ll need the star of the show, the Biscoff cookies, to make both the crust and topping. The secret to its rich flavor comes from the creamy Biscoff cookie butter, which infuses the filling and topping with that signature spiced sweetness. Here’s everything you need:
- 8.8 ounces Biscoff cookies, crushed – this forms our incredible spiced crust
- 1/3 cup unsalted butter, melted – binds the cookie crumbs together
- 16 ounces full fat brick-style cream cheese, softened – essential for a smooth, creamy texture; make sure it’s at room temperature!
- 1/2 cup powdered sugar – for sweetness and a silky smooth filling
- 1 teaspoon vanilla extract – enhances all the flavors
- 1 cup Biscoff cookie butter – the heart of our cheesecake filling
- 1 1/4 cups heavy cream, cold – whipped to create that light, airy texture
- 1/4 cup Biscoff cookie butter, melted – for a luscious topping
- 2 Biscoff cookies, crushed – for a final decorative touch
How to Make Biscoff Cookie Crust Cheesecake
Let’s dive into the fun part – creating this dreamy, no-bake delight! These straightforward Biscoff crust cheesecake instructions will guide you through every step, ensuring a perfect result. I love starting with the pan prep because it makes the final removal so much easier. This no bake biscoff cheesecake is truly a breeze to put together.
Preparing the Biscoff Crust
First, let’s get that amazing crust ready. Take your 8-inch springform pan and invert the base so the flat side is up. This trick helps create a smooth bottom for your cheesecake. Spray the pan lightly with non-stick spray and place a square of parchment paper on the bottom. For extra insurance against sticking, you can add parchment strips around the sides. Now, pulse your Biscoff cookies in a food processor until they’re finely ground, like sand. Mix in the melted butter until everything is beautifully combined. Press this mixture firmly into the prepared pan using the bottom of a measuring cup to create an even, compact layer. Pop it in the freezer while we whip up the filling.
Creating the Creamy Biscoff Filling
In your stand mixer, beat the softened cream cheese, powdered sugar, and vanilla extract until the mixture is completely smooth and lump-free. This step is crucial for that silky texture. Next, add the star ingredient: Biscoff cookie butter! Beat it in until it’s fully incorporated, giving the filling a gorgeous tan color and that unmistakable Biscoff flavor. Finally, add the cold heavy cream. Whip it all together until the mixture thickens and forms soft peaks. You’ll see it transform into luscious, creamy goodness. For more dessert inspiration, check out these desserts.
Assembling and Chilling the Cheesecake
Carefully spoon the creamy Biscoff filling over your chilled crust. Use a spatula to spread it evenly, smoothing the top for a professional finish. Now comes the hardest part: waiting! This cheesecake needs to chill in the refrigerator for at least 6 to 8 hours, but I highly recommend chilling it overnight. This allows the flavors to meld and the cheesecake to set up perfectly, giving you that ideal texture. These Biscoff cheesecake preparation steps are key to a successful dessert.
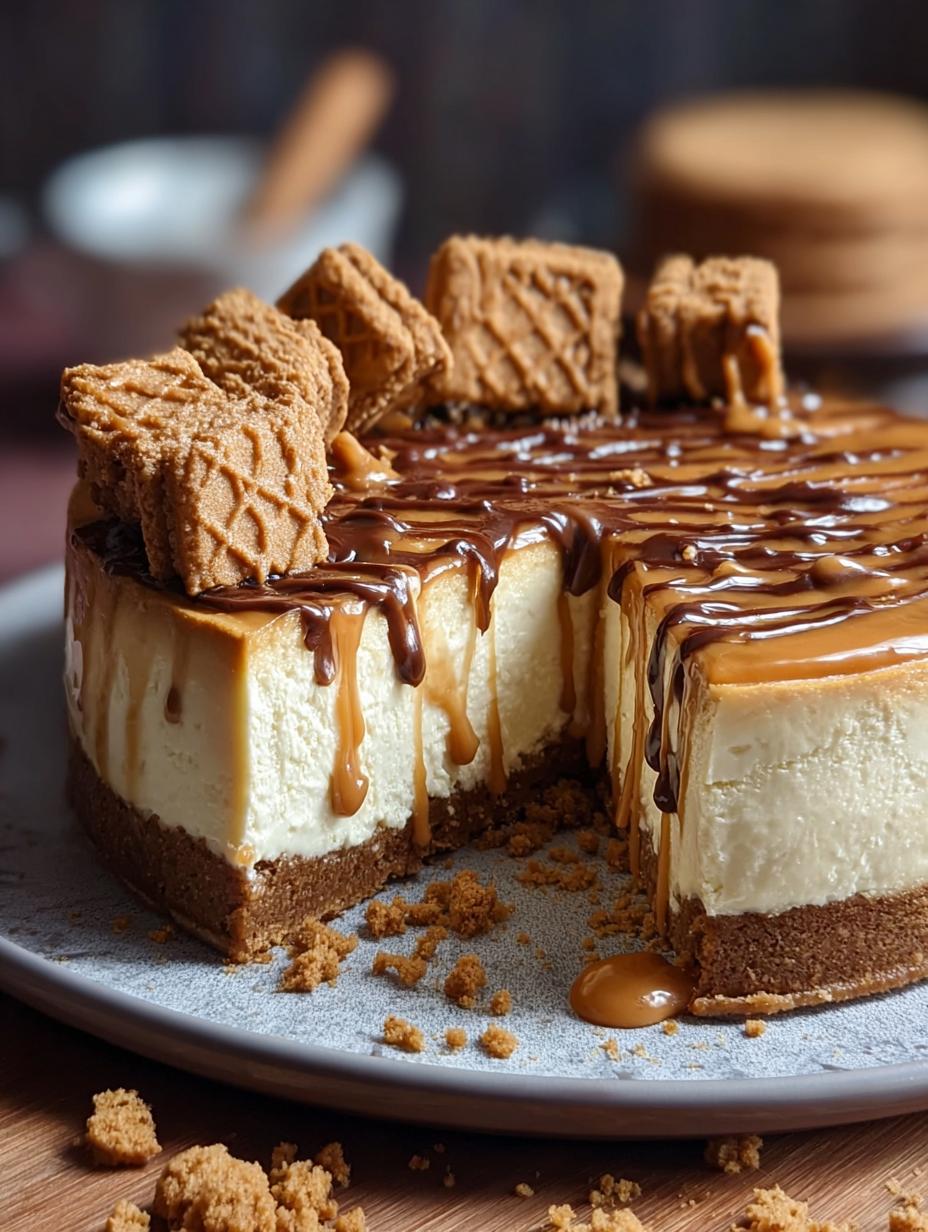
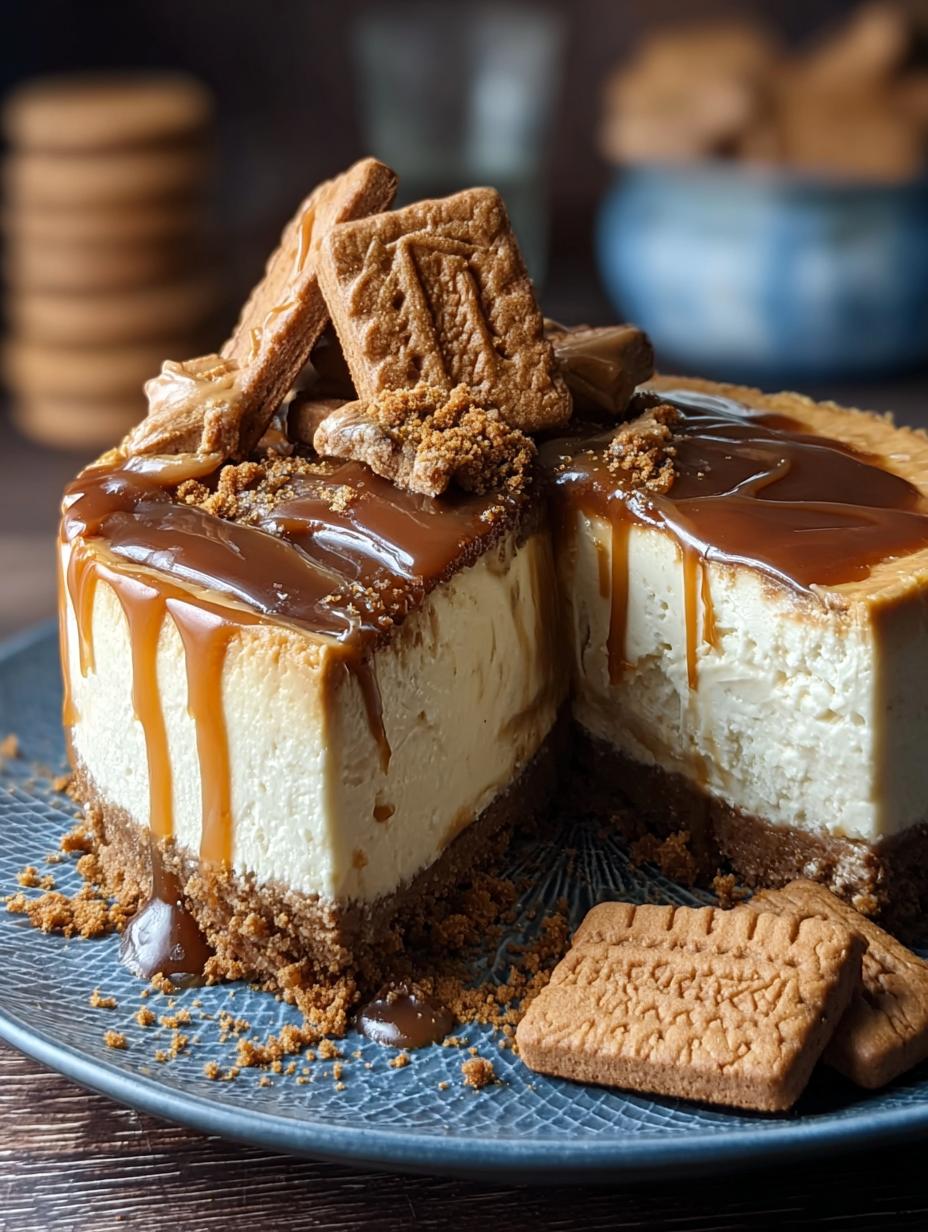
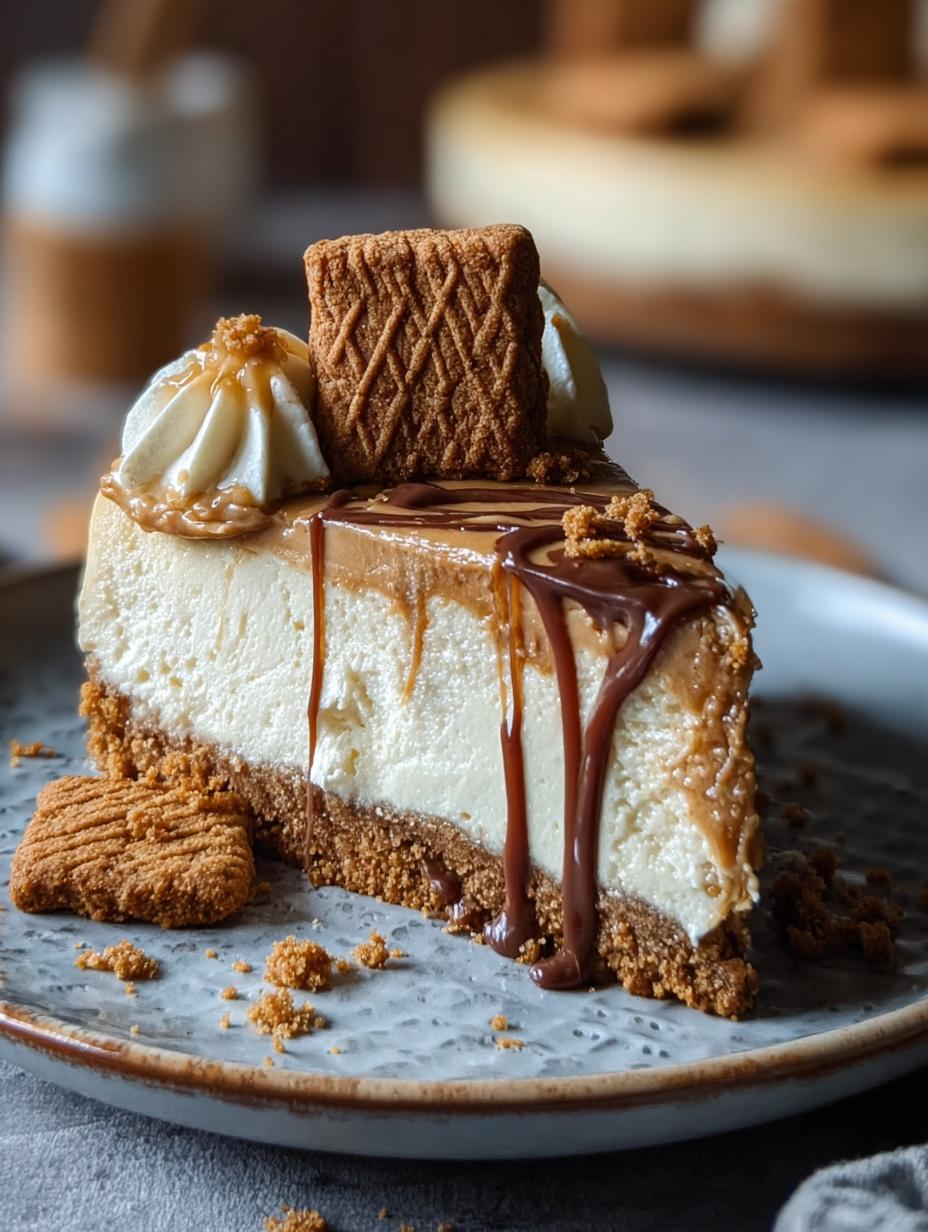
Garnishing Your Biscoff Cheesecake
Once your cheesecake is fully set, it’s time for the final flourish! Gently remove the springform ring and peel away the parchment paper. Melt the remaining 1/4 cup of Biscoff cookie butter in the microwave in short bursts until it’s smooth and pourable. Drizzle this decadent melted cookie butter all over the top of your cheesecake. Sprinkle the crushed Biscoff cookies over the drizzle for a lovely texture and visual appeal. A quick 10-minute chill will set the topping just right.
Pro Tips for the Best Biscoff Cheesecake Ever
I’ve made this dessert more times than I can count, and these little tricks have elevated my cheesecake game. Follow these tips for a truly spectacular result!
- Always use full-fat, brick-style cream cheese. The lower-fat or spreadable versions contain more water and won’t set up properly, leading to a softer cheesecake. Make sure it’s softened to room temperature to avoid lumps.
- Don’t overmix the filling once you add the heavy cream. Whip just until soft peaks form. Overwhipping can incorporate too much air, which can cause cracks when chilling or a less dense texture.
- Chill time is crucial! While 6-8 hours is the minimum, letting this cheesecake set overnight in the fridge truly makes a difference in texture and flavor melding.
- If your Biscoff cookies are tough to crush, a quick pulse in a food processor is your best friend. For the topping, melt the cookie butter in short, 30-second intervals to prevent it from overheating and separating.
What’s the secret to a perfectly creamy Biscoff cheesecake?
The secret lies in starting with room temperature, full-fat brick cream cheese and whipping the heavy cream just until soft peaks form. This ensures a smooth, dense, and utterly creamy texture that truly makes this the best biscoff cheesecake ever.
Can I make this Biscoff cheesecake without graham crackers?
Absolutely! This recipe is specifically designed to use Biscoff cookies for the crust, eliminating the need for graham crackers entirely. The unique spiced flavor of Biscoff is what makes this cheesecake so special. So yes, you can definitely make this Biscoff cheesecake without graham crackers!
How do I avoid common mistakes with Biscoff cheesecake?
To avoid a lumpy filling, ensure your cream cheese is fully softened. For a firm crust, press the crumbs down really well. And remember, patience is key – don’t rush the chilling process, as overnight refrigeration is best for optimal texture.
Best Ways to Serve Biscoff Cookie Crust Cheesecake
Now that you’ve created this masterpiece, let’s talk about serving it up! This cheesecake is rich and decadent on its own, but a few thoughtful pairings can elevate it even further. For a truly delightful experience, consider serving it slightly chilled, allowing the creamy filling to be perfectly contrasted by the spiced cookie crust. This is where you’ll find some fantastic Biscoff cheesecake dessert inspiration.
- Simple Elegance: Serve generous slices as is. The intense Biscoff flavor needs little else to shine.
- With Whipped Cream: A dollop of lightly sweetened whipped cream is a classic pairing that adds a cloud-like texture.
- Fruit Harmony: While not traditional, a small side of fresh berries like raspberries or a tart cherry compote can provide a nice counterpoint to the sweetness.
Nutrition Facts for Biscoff Cookie Crust Cheesecake
This decadent dessert is a treat, and here’s a look at the estimated nutritional breakdown per slice. This recipe yields 8 generous servings, showcasing the rich flavors of Biscoff.
- Calories: 450
- Fat: 34g
- Saturated Fat: 20g
- Unsaturated Fat: 10g
- Trans Fat: 0g
- Carbohydrates: 38g
- Fiber: 1g
- Sugar: 28g
- Sodium: 310mg
- Protein: 5g
- Cholesterol: 80mg
Nutritional values are estimates and may vary based on specific ingredients used. For more healthy options, explore these zucchini recipes.
How to Store and Reheat Biscoff Cookie Crust Cheesecake
Properly storing your delicious cheesecake ensures it stays fresh and flavorful. Once your masterpiece has completely cooled (this is super important!), you’ll want to get it ready for its chill time. For the best Biscoff cheesecake storage, cover it tightly with plastic wrap or place it in an airtight container. This prevents it from absorbing other odors in your refrigerator.
In the fridge, this cheesecake will keep beautifully for about 3 to 4 days. If you find yourself with leftovers longer than that, or if you want to save some for a future craving, freezing is a great option. Wrap individual slices securely in plastic wrap, then add a layer of aluminum foil or place them in a freezer-safe bag. It can stay frozen for up to 3 months. When you’re ready to enjoy a frozen slice, simply thaw it overnight in the refrigerator. There’s no need to reheat this no-bake wonder; it’s best served chilled!
Frequently Asked Questions About Biscoff Cheesecake
What is Biscoff cheesecake?
A Biscoff cheesecake is a delightful dessert that swaps out traditional graham cracker crusts for a base made entirely of crushed Biscoff cookies. These spiced, caramelized cookies lend a unique flavor and aroma that makes the cheesecake incredibly special. It’s a no-bake wonder that’s rich, creamy, and packed with that signature Biscoff taste.
What are some good Biscoff cheesecake filling ideas?
The classic filling for a Biscoff cheesecake is a rich cream cheese base infused with Biscoff cookie butter, which provides incredible depth of flavor. You can also experiment with adding a swirl of cookie butter into the filling, or even incorporating a bit of whipped cream cheese for an even lighter texture. Some people love adding a hint of cinnamon or even a touch of espresso powder to complement the cookie butter. For a different kind of creamy delight, try this chocolate cherry cheesecake.
Can I make this Biscoff cheesecake without a springform pan?
While a springform pan makes removal much easier, you can adapt this recipe. Press the crust into a pie plate or a 9×13 inch baking dish. For a pie plate, you’ll need to slice it like a pie. If using a baking dish, you can cut it into squares. Just be sure to press the crust down firmly so it holds together well.
How do I ensure my no-bake Biscoff cheesecake sets properly?
The key to a properly set no-bake cheesecake is patience and proper chilling. Make sure your cream cheese is fully softened to avoid lumps, and whip the heavy cream until soft peaks form. Most importantly, allow ample chilling time – at least 6-8 hours, but overnight is truly best. This allows the filling to firm up and the flavors to meld beautifully for the perfect texture. Learn more about proper baking and chilling techniques for cheesecakes from resources like Food Network.
Variations of Biscoff Cheesecake You Can Try
While this no-bake version is spectacular, the world of Biscoff cheesecake is vast and delicious! If you’re looking for new ways to enjoy those irresistible spiced cookies, consider these variations. For those who love the original, you can find many a delightful Lotus biscoff cheesecake recipe online that offers subtle twists on the classic.
- Baked Biscoff Cheesecake: If you prefer a traditional baked cheesecake, you can adapt this recipe. After preparing the crust and filling, bake at 325°F (160°C) for about 50-60 minutes, or until the edges are set and the center is slightly jiggly. Let it cool completely before chilling.
- Mini Biscoff Cheesecakes: Instead of a large springform pan, use a muffin tin lined with cupcake liners. Press the crust into the bottom of each liner and fill with the cheesecake mixture. These individual treats are perfect for parties and set much faster.
- Chocolate Biscoff Cheesecake: Elevate your Biscoff cookie butter cheesecake by adding melted semi-sweet or dark chocolate to the cream cheese filling. This creates a richer, more decadent flavor profile that pairs beautifully with the Biscoff spices.
- Dietary Adaptations: For a gluten-free version, simply use gluten-free Biscoff cookies. You can also experiment with vegan cream cheese alternatives and plant-based whipping cream to create a dairy-free delight.

Biscoff Cookie Crust Cheesecake: Amazing No-Bake Treat
- Total Time: 6-8 hours (includes chilling time)
- Yield: 8 servings 1x
- Diet: Vegetarian
Description
An easy no-bake Biscoff cookie crust cheesecake recipe featuring a creamy filling and a decadent Biscoff cookie butter topping. Perfect for any occasion.
Ingredients
- 8.8 ounces Biscoff cookies, crushed
- 1/3 cup unsalted butter, melted
- 16 ounces full fat brick-style cream cheese, softened
- 1/2 cup powdered sugar
- 1 teaspoon vanilla extract
- 1 cup Biscoff cookie butter
- 1 1/4 cups heavy cream, cold
- 1/4 cup Biscoff cookie butter, melted
- 2 Biscoff cookies, crushed
Instructions
- Invert the base of an 8-inch springform pan to remove the lip for easier removal. Spray with non-stick spray and line the bottom with a square sheet of parchment paper without trimming. Optionally, line the sides with parchment strips for easier removal.
- Process Biscoff cookies in a food processor until finely ground. Add melted butter and pulse until thoroughly combined. Transfer the mixture to the prepared pan and firmly press down using the flat base of a measuring cup to create an even, compact crust. Freeze while preparing the filling.
- In a stand mixer, beat cream cheese, powdered sugar, and vanilla extract until smooth. Incorporate Biscoff cookie butter and continue beating until fully integrated.
- Add cold heavy cream and whip until the mixture thickens and holds soft peaks.
- Spread the cheesecake filling evenly over the chilled crust, smoothing the surface. Refrigerate for at least 6 to 8 hours or overnight to set.
- Remove cheesecake from pan using the parchment overhang and peel away parchment. Melt additional Biscoff cookie butter in 30-second increments in the microwave until pourable. Drizzle melted butter over the top and sprinkle with crushed Biscoff cookies.
- Chill for 10 minutes to set topping before slicing and serving.
Notes
- For best results, refrigerate overnight for optimal cheesecake texture.
- Ensure the cream cheese is softened to avoid lumps in the filling.
- Feel free to customize the topping with more Biscoff or even chocolate drizzle.
- Prep Time: 30 minutes
- Cook Time: 0 minutes
- Category: Dessert
- Method: No bake
- Cuisine: American
Nutrition
- Serving Size: 1 slice
- Calories: 450
- Sugar: 28 g
- Sodium: 310 mg
- Fat: 34 g
- Saturated Fat: 20 g
- Unsaturated Fat: 10 g
- Trans Fat: 0 g
- Carbohydrates: 38 g
- Fiber: 1 g
- Protein: 5 g
- Cholesterol: 80 mg