Introduction
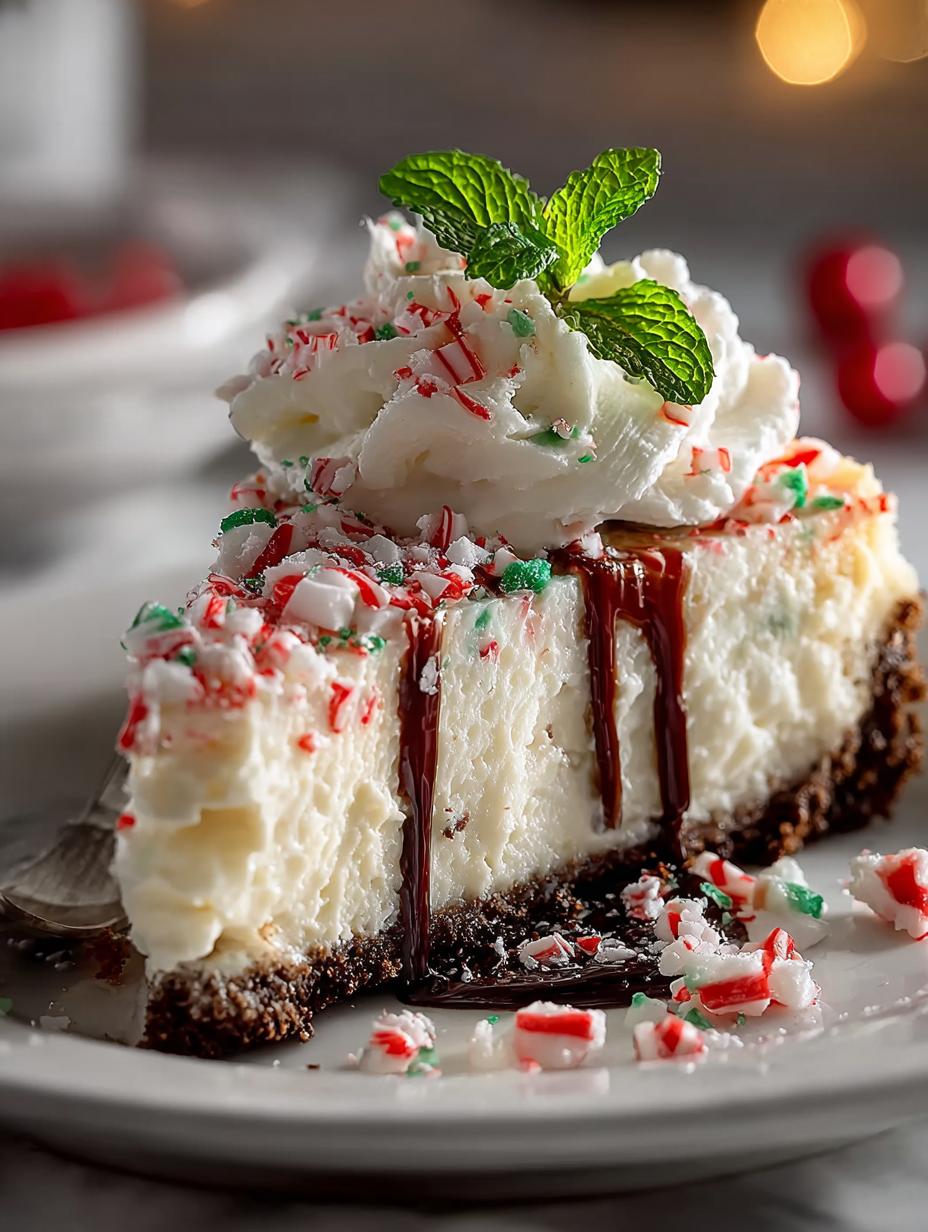
Bake Peppermint Cheesecake Holiday is a delightful treat that will make your festive gatherings even more special. This no-bake peppermint cheesecake is incredibly easy to prepare and offers a creamy, dreamy texture with a refreshing mint flavor. Perfect for the holiday season, it will surely satisfy your sweet tooth and impress your guests at any Christmas gathering.

Why You’ll Love This Bake Peppermint Cheesecake Holiday
This holiday peppermint cheesecake is not only easy to make, but it also delivers fantastic flavors that embody the spirit of Christmas. Here are some reasons to love it:
- It’s a no-bake recipe, making it a quick and convenient dessert option.
- The creamy peppermint cheesecake is perfect for those who enjoy minty flavors.
- It serves as a stunning centerpiece for your holiday table.
- This dessert is vegetarian-friendly, catering to various dietary preferences.
- It can be made ahead of time, allowing you to enjoy stress-free holiday celebrations.
- With a chocolate crust, it adds a rich contrast to the minty filling, making it part of the best peppermint cheesecake for Christmas.
- It can easily be customized with different toppings, such as whipped cream or crushed peppermint candy.
- It’s a festive mint cheesecake that will leave your guests raving about your baking skills!
Ingredients for Bake Peppermint Cheesecake Holiday
Gather these items:
- 1 ½ cups graham cracker crumbs
- ½ cup unsalted butter, melted
- 1 cup powdered sugar
- 16 oz cream cheese, softened
- 1 cup heavy whipping cream
- 1 teaspoon vanilla extract
- 1 teaspoon peppermint extract
- ½ cup crushed peppermint candy (for garnish)
How to Make Bake Peppermint Cheesecake Holiday Step-by-Step
- Step 1: In a mixing bowl, combine the graham cracker crumbs and melted butter. Mix until the crumbs are well coated and resemble wet sand.
- Step 2: Press the graham cracker mixture evenly into the bottom of the 9-inch springform pan to form the crust. Make sure it is tightly packed down.
- Step 3: In another mixing bowl, combine the softened cream cheese and powdered sugar. Use an electric mixer or whisk to blend until smooth and creamy.
- Step 4: Add the vanilla extract and peppermint extract to the cream cheese mixture, mixing until well combined.
- Step 5: In a separate bowl, whip the heavy cream until stiff peaks form.
- Step 6: Gently fold the whipped cream into the cream cheese mixture using a rubber scraper. Be careful not to deflate the whipped cream.
- Step 7: Pour the cheesecake filling over the prepared crust in the springform pan, spreading it evenly with a spatula.
- Step 8: Cover the cheesecake with plastic wrap or aluminum foil and refrigerate for at least 4 hours, or until set.
- Step 9: Before serving, garnish the top with crushed peppermint candy for added flavor and decoration.

Pro Tips for the Perfect Bake Peppermint Cheesecake Holiday
Keep these in mind:
- Ensure your cream cheese is at room temperature for a smoother filling.
- Don’t rush the chilling process; allow at least 4 hours for the cheesecake to set properly.
- For an extra festive touch, use a peppermint cheesecake with whipped cream topping to enhance the presentation.
- Consider adding a layer of chocolate ganache on top for a delicious twist.
Best Ways to Serve Bake Peppermint Cheesecake Holiday
Here are some ideas to serve this delightful dessert:
- Slice and serve with a dollop of whipped cream on top.
- Pair with hot cocoa or coffee for a warm beverage option.
- For a festive touch, sprinkle additional crushed peppermint candy around the plate.
How to Store and Reheat Bake Peppermint Cheesecake Holiday
To store, cover the cheesecake with plastic wrap and keep it in the refrigerator for up to 5 days. It’s a great make-ahead dessert, perfect for meal prep during the busy holiday season. For best results, do not freeze, as it may alter the creamy texture.
Frequently Asked Questions About Bake Peppermint Cheesecake Holiday
What’s the secret to perfect Bake Peppermint Cheesecake Holiday?
The secret lies in ensuring your ingredients are at room temperature, especially the cream cheese. This creates a smoother, creamier filling. Also, be gentle when folding in the whipped cream to maintain its lightness.
Can I make Bake Peppermint Cheesecake Holiday ahead of time?
Absolutely! This cheesecake is perfect for making a day or two in advance. Just keep it covered in the refrigerator until you’re ready to serve.
How do I avoid common mistakes with Bake Peppermint Cheesecake Holiday?
To avoid common mistakes, ensure that the crust is packed tightly and allow enough chilling time for the filling to set properly. Also, gently fold in the whipped cream to maintain its volume.
Variations of Bake Peppermint Cheesecake Holiday You Can Try
Here are some fun variations to consider:
- Add a layer of chocolate ganache for a peppermint cheesecake with chocolate crust.
- Incorporate crushed Oreos into the crust for a chocolate mint flavor.
- Top with festive berries for a seasonal peppermint dessert option.
- Experiment with different extracts, like vanilla or almond, for unique flavors.
For more delicious dessert ideas, check out Pumpkin Pecan Cobbler or Irresistible Peach Upside Down Mini Cakes. If you’re looking for a great holiday treat, consider Chewy Maple Pecan Pumpkin Cookies as well!
For more information on the benefits of peppermint, you can visit Healthline.
Print
Bake Peppermint Cheesecake Holiday: 8 Festive Steps
- Total Time: 4 hours 20 minutes
- Yield: 8 servings 1x
- Diet: Vegetarian
Description
A delicious and easy no-bake peppermint cheesecake perfect for the holiday season.
Ingredients
- 1 ½ cups graham cracker crumbs
- ½ cup unsalted butter, melted
- 1 cup powdered sugar
- 16 oz cream cheese, softened
- 1 cup heavy whipping cream
- 1 teaspoon vanilla extract
- 1 teaspoon peppermint extract
- ½ cup crushed peppermint candy (for garnish)
Instructions
- In a mixing bowl, combine the graham cracker crumbs and melted butter. Mix until the crumbs are well coated and resemble wet sand.
- Press the graham cracker mixture evenly into the bottom of the 9-inch springform pan to form the crust. Make sure it is tightly packed down.
- In another mixing bowl, combine the softened cream cheese and powdered sugar. Use an electric mixer or whisk to blend until smooth and creamy.
- Add the vanilla extract and peppermint extract to the cream cheese mixture, mixing until well combined.
- In a separate bowl, whip the heavy cream until stiff peaks form.
- Gently fold the whipped cream into the cream cheese mixture using a rubber scraper. Be careful not to deflate the whipped cream.
- Pour the cheesecake filling over the prepared crust in the springform pan, spreading it evenly with a spatula.
- Cover the cheesecake with plastic wrap or aluminum foil and refrigerate for at least 4 hours, or until set.
- Before serving, garnish the top with crushed peppermint candy for added flavor and decoration.
Notes
- Prep Time: 20 minutes
- Cook Time: 0 minutes
- Category: Dessert
- Method: No-bake
- Cuisine: American
Nutrition
- Serving Size: 1 slice
- Calories: 400
- Sugar: 18g
- Sodium: 250mg
- Fat: 30g
- Saturated Fat: 18g
- Unsaturated Fat: 10g
- Trans Fat: 0g
- Carbohydrates: 30g
- Fiber: 1g
- Protein: 4g
- Cholesterol: 80mg